Step by Step
Finitura Liscia (Toscana Smooth)
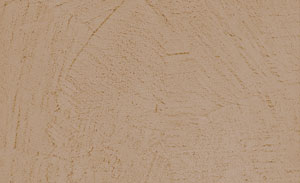
Finitura Liscia (fin-eh-tour-ah lee-sha), Italian for “smooth finish”. Elegant simplicity is the best description for this timeless wall and furniture finish. Create an array of pastel hues by experimenting with various color combinations. The look and feel of Toscana – Smooth finish will be greatly appreciated by your well-traveled clients.
Materials List:
• Pro-Toscana Base
• Blue Steel Spatulas
• Plastic Float
• Pro Faux Mixer (Optional)
• Sea Sponge
• Pro Venetian Neutral Base
• 150 grit sandpaper (optional)
• Flat or Satin Acrylic Wax
Application Method:
Prime the wall surface with acrylic or oil based flat primer sealer. No additional prep or sealing coats are required.
1. Tint the Pro Toscana Base with 25% latex paint (taupe) and mix well. (Pro Toscana is a premixed permanent hard, heavy texture for Old World looks and feel, similar to an exterior white concrete, this durable product contains a fine sharp aggregate. Ready to tint or apply. All Pro Toscana Base gallons can be tinted and stirred using a Pro Faux Mixer and power drill.
2. Use two clean Blue Steel Spatulas to trowel on in uniform thickness.
3. Allow to set several minutes before leveling with humidified plastic float. Let dry several hours to overnight.
4. Add interest to the pattern with a slightly damp sea sponge. Let dry several hours to overnight.
5. Fill “tooth” with two coats of Pro Venetian Neutral Base using spats or. Burnish lightly between coats.
6. Optional: Sand out dark marks with 150 grit sandpaper and palm sander if desired and then seal with Pro Faux Flat or Satin Acrylic Wax and burnish for a waterproof finish.
Variations on a theme.
Create subtle color variations by experimenting with various colorants, other Pro Toscana bases and concentration. The sheen can be controlled by the burnishing process. Pro Faux Waxes can add even more effects.
Color and Seal Toscana finishes with two easy methods:
Method 1 – Stain with the Pro Faux Stonewash Pigments using watery washes and cellulose sponges. Let dry 20 minutes to overnight. Protect Stonewash pigments by rolling-on a full coat of Pro Faux Acrylic Zero Gloss Varnish.
Method 2 – Mix Pro Faux Open-Time Glaze with latex paint color. Brush and roll. Remove excess with brushes or heavy rags.
Application: Thickness does not affect Pro Faux Toscana product. May be applied with tools such as brush, roller, spatula and trowel. Coverage: Varies widely depending upon application method. 25-175 sq.ft. per gallon.
Drying Time: Allow 2 hours to overnight, depending on film thickness (68 degrees @ 65% RH).
Clean Up & Disposal: Use hot water for application equipment. Do not dispose of any product in sewers, waterways or municipal garbage. Allow waste product to harden before disposal. If liquid disposal is necessary, contact your local municipality or paint store for instructions.
Here are the steps!

Step 1: After preparing the surface, tint the Pro Toscana Base with 25% latex paint (taupe) and mix well Use two clean Blue Steel Spatula to spread out the material on the wall surface. (Use one to hold the material and the other to apply it).

Step 2: Use two clean Blue Steel Spatulas to trowel on in uniform thickness.

Step 3: Allow to set several minutes before leveling with humidified plastic float.

Step 4: Add interest to the pattern with a slightly damp sea sponge. Let dry several hours to overnight.

Step 5: Fill “tooth” with two coats of Pro Venetian Neutral Base using spats. Burnish lightly between coats.

Step 6: Optional: Sand out dark marks with 150 grit sandpaper and palm sander if desired and then seal with Pro Faux Flat or Satin Acrylic Wax and burnish for a waterproof finish.

